Posted by kejohn
on November 03, 2025


You can start red light therapy at home without stress or confusion. Light therapy feels easy and safe, even if you have never tried it before. Many people notice less pain, better skin, or even new hair growth when they use light therapy for home use. You might see wounds heal faster, fine lines fade, and your skin glow. If you stick with red light therapy basics, you give your body a chance to renew and recover. At home red light therapy helps you build a healthy routine you can trust.
Key Takeaways
- Start red light therapy by prepping your skin. Clean your face or body and stay hydrated for the best results.
- Use your device correctly. Keep it 6-12 inches from your skin and wear protective goggles to ensure safety.
- Follow a consistent schedule. Aim for 3-5 sessions a week, starting with 10-20 minutes each time to see improvements.
- Choose the right device for your needs. Options include full-body panels, face masks, and handheld devices for targeted treatment.
- Track your progress. Keep a journal or take photos to notice changes in your skin and overall wellness over time.
Beginner’s Guide to Red Light Therapy at Home
Quick Start Steps
Ready to try light therapy? This beginner’s guide will help you get started with confidence. Here’s a simple step-by-step plan:
- Prep your skin: Wash your face or body to remove makeup, sunscreen, or lotions. Drink some water to stay hydrated. Wear loose, comfy clothes.
- Set up your device: Place your light therapy device about 6-12 inches from your skin. If you’re using it on your face, keep it closer. For your body, follow the device’s instructions.
- Start your session: Begin with 3-5 sessions each week. Use the device for 1-10 minutes on each area. As you get used to it, you can work up to 20 minutes.
- Stay safe: Always wear protective goggles. Make sure your skin is bare so the light can do its job.
Tip: If you use a full-body device like the Quasar MD Sleeping Bag, you can relax and let the light therapy cover you from head to toe.
What to Know Before You Begin
Before you dive in, there are a few key considerations for beginners. Light therapy works best when you follow the rules and listen to your body.
- Make sure your device is set up right. The correct wavelength and power matter for good results.
- Always wear eye protection. This keeps your eyes safe from bright lights.
- If you have a health condition, talk to your doctor first.
- Sometimes, you might see a little redness or feel mild warmth. This usually goes away fast.
- Stick to the instructions from your device’s maker. Too much light can cause redness or swelling.
Here’s a table to clear up some common myths about at home red light therapy:
| Myth | Truth |
|---|---|
| Red light therapy is just a fad | People have used it since the 1800s. |
| Red light therapy is dangerous | It’s safe for most people when you use it right. |
| You need expensive equipment | Many devices are affordable for home use. |
| Red light therapy is only for skin | It helps with pain, sleep, and more. |
| Results are instant | You’ll see changes after a few weeks of steady use. |
When you follow this beginner’s guide, you set yourself up for success. Remember these key considerations for beginners, and you’ll feel more comfortable as you start your red light therapy at home journey.
What Is Red Light Therapy?
How It Works
Red light therapy uses special wavelengths of light to help your body heal and feel better. When you turn on a device, gentle red and near-infrared light shines onto your skin. Your cells soak up this light, which boosts energy and helps them work harder. You might notice your skin feels softer or looks brighter after a few sessions. This process can also help with wound healing and tissue healing by speeding up how fast your body repairs itself.
You don’t need to worry about safety. Red light therapy does not cause skin cancer or damage your tissues like UV light. You get drug-free relief without harsh chemicals or heat. Many people use light therapy because it’s non-invasive and safe for all skin types. If you have sensitive skin or want to avoid strong treatments, this option works well.
Did you know? Red light therapy can help your body make more collagen. Collagen keeps your skin firm and smooth. You may see improvements in skin tone and skin complexion as you keep using it.
Home Red Light Therapy Benefits
You can enjoy many health benefits when you use light therapy at home. Here are some of the top benefits of red light therapy:
- You may see fewer fine lines and wrinkles as collagen production increases.
- Your skin benefits include less redness, smoother texture, and lighter dark spots.
- Wound healing gets a boost, so cuts and scrapes heal faster.
- You might notice less swelling and inflammation after workouts or injuries.
- Hair growth can improve if you use light therapy for several months.
- You get drug-free relief from pain and soreness.
Here’s a quick look at what studies say about skin benefits and wound healing:
| Study Title | Findings | Year |
|---|---|---|
| Blue-Red LED Phototherapy for Acne | Helped clear acne and improved skin tone | 2013 |
| PBM for Hair Disorders | Increased hair density and length | N/A |
Most people report softer, smoother skin and better skin tone after regular sessions. You can use light therapy to support wound healing, boost collagen production, and enjoy home red light therapy benefits every week.
Choosing Your At Home Red Light Therapy Device
Types of Devices
When you start looking for at-home devices, you will see many options. Each type of red light therapy device works best for different needs. Here are some of the most popular choices:
- Full-body panels: These cover large areas and help with whole-body recovery.
- Face masks: These target your face, helping with skin issues like acne or fine lines.
- Handheld or spot devices: These work well for small, sore spots and are easy to carry.
- Wraps or sleeves: These flexible devices fit around joints or muscles for pain relief.
- Portable units: These are great if you want to use light therapy while traveling or in small spaces.
You might also see red light therapy panel systems. These are best for treating bigger areas or even your whole body. Flexible wraps work well for knees or shoulders. Handheld wands are perfect for your face or small spots. Face masks focus on facial care. With so many at-home devices, you can find one that fits your lifestyle.
Quasar MD Sleeping Bag Overview
Let’s talk about the Quasar MD Sleeping Bag. This at-home red light therapy device stands out because of its unique design. You simply get inside, zip it up, and let the light therapy work on your whole body. The wrap-around style gives you 360° coverage, so you do not need to move or change positions. Every part of you gets the same treatment at once.
The Quasar MD Sleeping Bag uses 7,560 dual-wavelength LEDs at 660nm and 850nm. These wavelengths help your muscles, joints, and skin. The device is FDA-cleared, which means it meets strict safety and effectiveness standards for home use. You can trust it to deliver real results without worry.
Unlike a regular mat or red light therapy panel, this sleeping bag surrounds you. You get full-body coverage and a relaxing experience. Many people use it to recover after workouts, ease joint pain, or even help with sleep. You just lie back and let the at-home device do the work.
What to Look For
Choosing the right device for red light therapy at home can feel confusing, but you can make it simple by focusing on a few key things:
- Wavelengths: Look for devices that use wavelengths between 630–850 nm. These work best for skin, pain, and recovery.
- Power: Higher power means deeper light penetration and better results.
- Build Quality: Pick at-home devices that feel sturdy and have reliable LED panels.
- Safety Features: Make sure the device has FDA clearance and includes eye protection.
- Ease of Use: Choose a red light therapy device that is easy to set up and use at home.
- Portability: If you travel or have limited space, look for smaller devices.
- Cost vs. Value: Think about your budget and what you want from your device. Sometimes, spending more upfront gives you better results and a longer-lasting product.
Tip: Always check for FDA certification. This means the device has passed safety tests and works as promised.
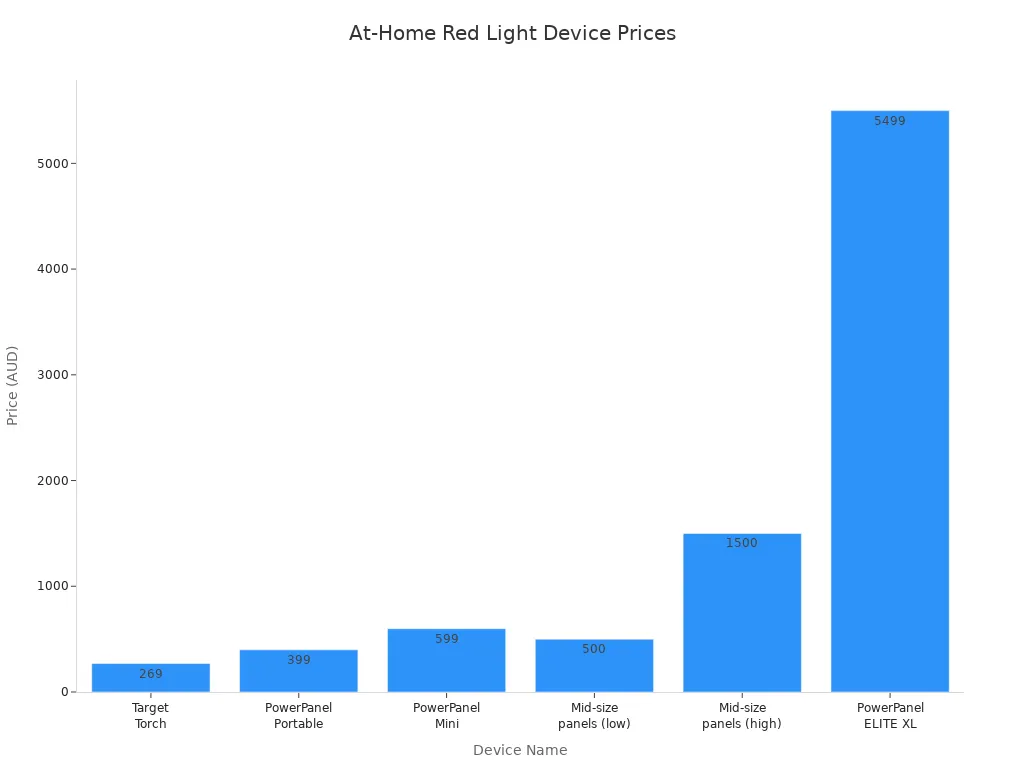
Here’s a table to help you compare prices and uses for different at-home devices:
| Device Name | Price (AUD) | Purpose/Use Case |
|---|---|---|
| Red Light Therapy Target Torch | 269 | Treating small areas of the body |
| Red Light Therapy PowerPanel Portable | 399 | General use, portable option |
| Red Light Therapy PowerPanel - ELITE XL | 5,499 | Full-body treatments for chronic pain or optimization |
| Red Light Therapy PowerPanel Mini | 599 | Mid-size option for average users |
| Mid-size panels | 500 - 1500 | Best fit for average person |
When you look at at-home devices, think about what you want to achieve. If you want full-body recovery, a device like the Quasar MD Sleeping Bag makes it easy. If you only need to treat small spots, a handheld device or a red light therapy panel might work better for you.
Choosing the right device for at home red light therapy means thinking about your goals, your space, and your budget. With so many devices for home use, you can find one that fits your needs and helps you get the most from light therapy.
How to Use Red Light Therapy Safely
Preparing for a Session
Getting ready for your light therapy session is easy. You want your skin clean and free from anything that might block the light. Here’s a simple routine you can follow before starting your first treatment session:
- Wash your skin gently to remove oils, sweat, and dirt.
- Exfoliate once or twice a week to clear away dead skin cells.
- Skip makeup and creams so the light can reach your skin.
- Use a light moisturizer if your skin feels dry, but avoid heavy creams.
- Take off any jewelry or shimmery makeup that could reflect the light.
If you use the Quasar MD Sleeping Bag, you just need to lie down and zip up. The wrap-around design covers your whole body, so you don’t have to worry about moving the device. You get full-body light therapy without any hassle.
Tip: Drink water before your session. Hydrated skin responds better to red light therapy treatment.
Session Duration and Frequency
You might wonder how often should you use red light therapy and how long each session should last. The recommended frequency for beginners is usually three to four times a week. Most devices suggest starting with 10-20 minute sessions. You can adjust your treatment schedule as your body gets used to the therapy.
Here’s a table to help you plan your treatment schedule:
| Treatment Goal | Frequency | Duration |
|---|---|---|
| Improving skin texture | 3-5 times per week | 10-20 minutes |
| Relief from muscle/joint pain | Daily or every other day | 12-15 minutes per area |
| Enhance tissue repair | 3-7 times per week | 10-20 minutes |
| Face/Anti-Aging | 3-5 times per week | 10 minutes |
| Skin Repair/Acne | Every other day | 5-12 minutes |
If you use the Quasar MD Sleeping Bag, you can start with 15-30 minute sessions, three to four times a week. Many people find that a 20-30 minute session in the evening helps them relax and sleep better. You can increase your session length as you get comfortable with your treatment schedule.
Note: Always follow the instructions for your device. This helps you avoid skin redness or discomfort.
Eye Protection and Skin Care
Protecting your eyes during light therapy is important. Direct exposure to red LED light can cause discomfort or eye strain. You have a few options for shielding your eyes:
You can use masks with built-in shields, tanning goggles, or soft fabric covers. These block the light and keep your eyes safe without causing discomfort.
Here’s a quick checklist for eye protection:
- Read the device instructions before each session.
- Use your mask or device in a bright room to reduce contrast.
- Start with short sessions so your eyes can adjust.
- Make sure your goggles fit well and block the light.
- Keep your face clean and dry for the best results.
Skin care matters before and after your red light therapy at home session. After your session, use gentle products with ingredients like ceramides, glycerin, or niacinamide. Avoid strong acids or retinoids for 24-48 hours. If you use sunscreen, pick one with zinc oxide or titanium dioxide.
| Product Type | Recommended Ingredients | Ingredients to Avoid |
|---|---|---|
| Moisturizer | Ceramides, glycerin, niacinamide | Alcohol, synthetic fragrances, parabens |
| Serum | Vitamin C, Vitamin E | Strong acids, retinoids (for 24-48 hours) |
| Sunscreen | Zinc oxide, titanium dioxide | Chemical filters (if skin is sensitive) |
You can also support your skin by eating foods rich in vitamins A, C, and E. Try to get enough sleep and manage stress. These habits help your skin recover and glow after each red light therapy treatment.
If you follow these steps, you make your at home red light therapy sessions safe and comfortable. The Quasar MD Sleeping Bag’s gentle materials and wrap-around design add extra comfort, so you can relax while the light therapy reduces pain and inflammation. Stick to your treatment schedule, listen to your body, and enjoy the benefits of red light therapy at home.
Building Your Red Light Therapy Routine
Tracking Progress
You want to see results from light therapy, right? Tracking your progress helps you stay motivated and notice changes that might sneak up on you. Here are some easy ways to keep tabs on your journey:
- Keep a journal. Write down how you feel after each session. Note changes in pain, skin texture, or sleep quality.
- Snap photos every week. Compare your skin, scars, or hair growth over time. Pictures show what words sometimes miss.
- Use a tape measure. Track joint size or muscle changes if you’re using light therapy for recovery.
- Rate your pain or skin condition on a scale from 1 to 10. This helps you spot improvements.
- Make a simple table to record your sessions and results.
| Date | Session Length | Area Treated | Notes/Changes |
|---|---|---|---|
| June 1 | 20 min | Face | Skin feels softer |
| June 4 | 25 min | Knees | Less soreness |
| June 7 | 20 min | Full Body | Better sleep |
Tip: Daily photos and notes help you see small improvements that add up over time.
Adjusting Over Time
Your light therapy routine should fit your needs. You don’t have to stick to the same schedule forever. Start with three to four sessions each week. If you notice great results, keep going. If progress slows down, try adding an extra session or increasing the time a little. If your skin feels irritated, cut back on frequency or shorten your sessions.
You can treat this schedule as a starting point. Adjust it as you learn what works best for you. Most people switch to a maintenance routine after a few weeks. Three to five sessions per week keep the benefits going. If you want to make light therapy part of your daily wellness, set a reminder or add it to your evening routine. Consistency brings the best results.
Remember: Your body is unique. Listen to it and change your routine when needed. At home red light therapy gives you the freedom to personalize your care.
Troubleshooting and Tips for Beginners
Common Issues
Starting light therapy at home can feel confusing, but you are not alone. Many beginners run into the same problems. Here are some common issues and how you can handle them:
- You might forget to use your device regularly. Skipping sessions slows your progress. Try setting a reminder on your phone.
- Wearing clothes or sunscreen during your session blocks the light. Always keep your skin bare for the best results.
- Finding the right distance from your device takes practice. Start with the recommended range and adjust if needed.
- Sessions that are too short or too long can affect your results. Stick to 10-20 minutes unless your device says otherwise.
- Using the wrong setting for red or near-infrared light can make a difference. Check your device instructions before you start.
- Not drinking enough water may slow your progress. Hydration helps your skin respond better to light therapy.
- Forgetting to track your progress makes it hard to see changes. Keep a simple journal or take photos.
- If you have a health condition, talk to your doctor before starting.
- Expecting instant results can lead to disappointment. Light therapy works best with patience.
Here’s a quick table to help you troubleshoot device problems:
| Issue | Potential Solutions |
|---|---|
| Device not turning on | Check power source, inspect cord, see if warm-up is needed |
| Dim or flickering light | Check bulb connections, replace bulbs, clean gently |
| Uneven light distribution | Adjust angle or distance, use more than one device |
Tip: Clean your device after each use and store it in a cool, dry place. This keeps your light therapy device working well.
When to Expect Results
You want to know when you’ll see changes from light therapy. Most people start to notice small improvements in about two to four weeks. Your skin may feel softer, and redness or irritation may calm down. Full benefits usually show up between eight and twelve weeks. Fine lines fade, breakouts slow down, and your skin feels firmer.
- You may see results in about a month.
- Many people notice changes in two to three weeks.
- Best results often appear after eight to twelve weeks.
How fast you see results depends on a few things:
| Factor | Description |
|---|---|
| Skin Condition and Type | Some skin types respond faster than others. |
| Treatment Frequency and Duration | Using your device three to five times a week works best. |
| Consistency With Treatment Plan | Sticking to your schedule helps you see results sooner. |
| Individual Health and Lifestyle | Good sleep, healthy food, and staying hydrated all help your skin glow. |
Here’s one of the best tips for using red light therapy: Stay patient and keep your routine steady. Your body needs time to respond, but you will see the benefits if you stick with it.
You can start red light therapy at home by picking a quiet spot, prepping your skin, and using the right device. Make sure you wear protective eyewear and keep your skin close to the light therapy source. Stick with three sessions a week and use a timer for each treatment. Remember, patience pays off—results take time. If you want full-body comfort, try the Quasar MD Sleeping Bag. Stay safe, stay consistent, and let light therapy help you take charge of your wellness journey.
Ready to glow? Your routine starts with one session. Keep going and watch the benefits build!
FAQ
How long does it take to see results from light therapy?
You might notice changes in your skin or pain levels after two to four weeks. Some people see results sooner. Keep using light therapy regularly for the best outcome.
Can I use light therapy every day?
You can use light therapy three to five times a week. Daily use is safe for most people, but you should start slow. Listen to your body and adjust your routine if you feel any discomfort.
Is light therapy safe for kids and teens?
Light therapy is safe for most ages. If you want your child or teen to try it, talk to a doctor first. Always follow the device instructions and use eye protection.
What should I do before a light therapy session?
- Wash your skin.
- Remove makeup and lotions.
- Drink water.
- Put on protective goggles.
Tip: Clean skin helps light therapy work better.
Can I use light therapy with other skin treatments?
You can combine light therapy with gentle skincare. Avoid strong acids or retinoids right after your session. Wait at least 24 hours before using harsh products.